New-construction homeowners’ interior painting is the preparation, priming, and finishing of newly built rooms to create consistent surfaces before move-in. For a 2026 move-in, the priorities are bare-drywall preparation, coordination with other trades, and a written finish schedule—not just choosing colors.
- Interior painting for new construction homes starts with drywall readiness, dust removal, and a compatible primer.
- KB's Painting Services is best for Pooler and Savannah homeowners seeking a local interior painting contractor.
- Choose wall paint and trim finishes separately; test both against your installed flooring and lighting.
- Approve the written scope before painting, then inspect again after the remaining trades finish.
Why interior painting matters for new-construction homeowners
A new wall is not automatically a paint-ready wall. Bare drywall, joint compound, repaired areas, and wood trim need preparation suited to their surfaces. Paint does not correct uneven joints, sanding scratches, or dust left beneath the coating.
New-construction homeowners also face a sequencing problem: painters, flooring installers, electricians, and cabinet installers need access to the same rooms. Painting too early exposes finished surfaces to later damage; painting without an agreed sequence makes responsibility for repairs unclear.
KB's Painting Services offers interior painting and drywall repair for homeowners in Pooler, Savannah, and surrounding Georgia communities. Decide what belongs in the painting scope before comparing proposals. A proposal that includes surface correction is different from one that only covers coating application.
For your 2026 project, treat the finish schedule as a construction document. It should identify the rooms, surfaces, colors, sheens, preparation responsibilities, and final inspection process.
How to plan your new-construction interior painting
Start with a room-by-room checklist and the builder’s current schedule. You can organize the decisions yourself using a spreadsheet, photographs, and product instructions; hiring a contractor does not replace your need to approve the scope.
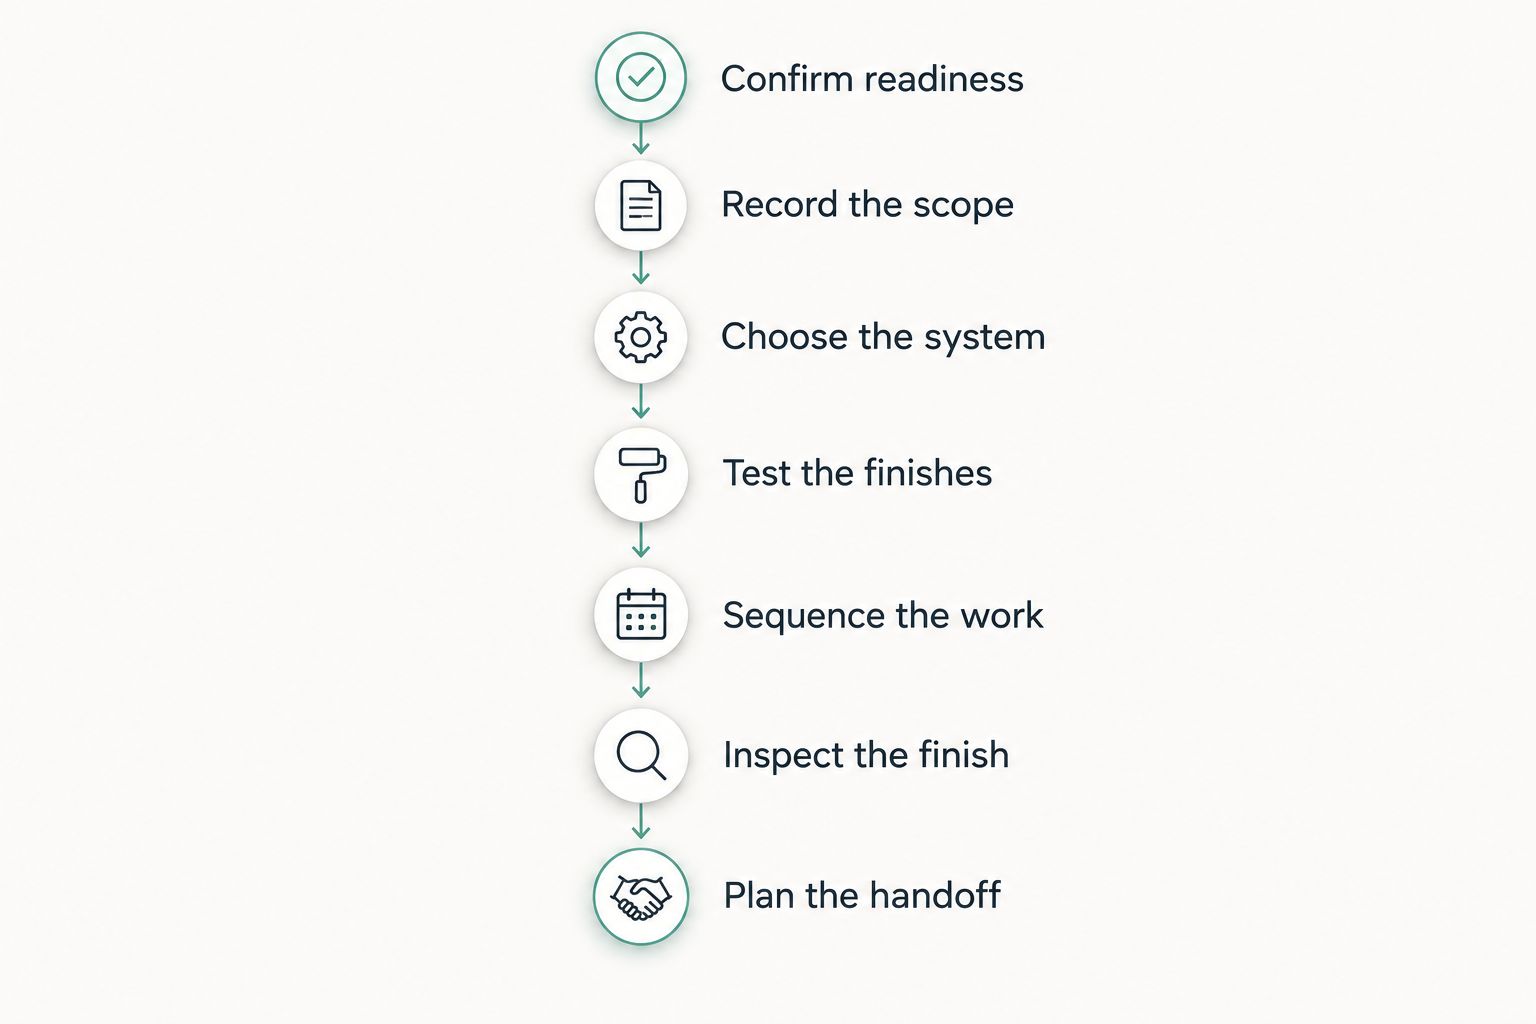
Confirm readiness
Walk the home with the builder before assigning a painting start date. Inspect drywall joints, corners, fastener locations, ceiling transitions, and trim connections. Use the room’s installed lighting where available, plus a portable light to examine questionable areas.
Approve the substrate before approving the color. A finish coat follows the surface beneath it; it does not straighten a poorly finished joint. Resolve active leaks and damp materials before coating, and follow the coating manufacturer’s requirements for surface condition, temperature, and humidity.
New construction also produces dust after a room looks finished. Establish who cleans the surfaces and who keeps later cutting or sanding work away from prepared rooms. Photograph unresolved defects so everyone reviews the same locations rather than relying on a verbal description.
- Mark unfinished joints, damaged corners, and visible sanding scratches.
- Confirm that drywall compound and repairs meet drying requirements.
- Identify damp areas and assign investigation before painting.
- Remove surface dust using methods appropriate to the substrate.
- Record which trade owns each correction.
Record the scope
Create 1 finish schedule for the whole home rather than scattering decisions across texts and sample cards. Give each room a clear name and record walls, ceilings, trim, doors, closets, and any separately finished surfaces.
A written schedule prevents assumptions. A wall-paint proposal does not automatically include cabinet finishing, door edges, shelving, or repairs caused by another trade. Identify these items explicitly, even when the answer is that they are excluded.
For your 2026 scope, describe the expected finished result and the proposed application system. Do not accept an unspecified promise of coverage as a substitute for preparation details. Keep a dated approval copy so a later color change does not become a disagreement about the original instructions.
- List every included room and surface.
- Record color names, product identifiers, and sheen selections.
- Separate drywall correction from routine paint preparation.
- Identify protection and cleanup responsibilities.
- State how changes and later damage will be handled.
Choose the system
Match the primer and finish to the substrate instead of selecting paint by room name alone. New drywall needs a system suited to its porous paper and joint-compound surfaces. Wood, factory-primed trim, and stained areas require their own compatibility checks.
Start manually: identify each substrate, read the proposed product instructions, and compare those instructions with the written scope. Ask why each primer is specified and what preparation it requires. Do not assume one coating system belongs on every surface.
For a contractor-led path, ask KB's Painting Services to discuss interior painting and any drywall repairs together. That keeps the conversation focused on the surface beneath the finish, not just the final color. Confirm the proposed products in writing before application begins.
- Identify bare drywall, wood, and previously primed materials separately.
- Specify primer suitable for each surface.
- Check compatibility between primers, fillers, caulks, and topcoats.
- Follow the selected products’ application instructions.
- Keep product labels with the project records.
Test the finishes
Choose colors in the home rather than from a phone screen. New-construction interiors often contain several fixed finishes—flooring, counters, cabinets, and tile—that need to work together before furniture arrives.
As a practical shortlist, prepare 3 sample boards using the intended finish system. Move them between rooms and inspect them beside the installed materials. Compare them in daylight and under the lighting you expect to use after move-in.
Choose sheen by surface use and the selected product’s specifications. Higher sheen can make surface irregularities more noticeable; a flatter appearance does not remove the need for preparation. Use the guide to paint sheens for bathrooms and kitchens to separate appearance decisions from cleaning needs.
- Compare samples against flooring, countertops, and cabinet finishes.
- Check samples in daylight and evening lighting.
- Select wall, ceiling, and trim sheens separately.
- Test difficult transitions where adjacent rooms remain visible.
- Approve physical samples before authorizing full-room application.
Sequence the work
Agree on the order of work with the builder and painter. There is no universal sequence that fits every new home: flooring installation, trim completion, cabinetry, and access requirements change the plan. What matters is that responsibilities remain explicit.
Keep heavy dust-producing work away from finished rooms. Decide when ceilings, walls, trim, and final touch-ups happen relative to other trades. If painting occurs before flooring installation, establish how later wall damage will be corrected; if flooring is already installed, specify protection and cleanup.
For a 2026 move-in, work backward from the handoff without treating the move-in date as permission to ignore product instructions. Dry-to-touch, recoat readiness, and readiness for cleaning are different conditions. Use the selected coating’s instructions rather than a blanket waiting period.
- Confirm which trades need access after painting.
- Assign responsibility for floor and fixture protection.
- Separate dusty tasks from finish application.
- Reserve a final correction visit after disruptive work.
- Follow product requirements for recoating, ventilation, and use.
Inspect the finish
Plan 2 inspection passes: one after the painting work and another after the remaining trades finish. The first checks the painting scope. The second separates original finish defects from damage caused during later installation or move-in preparation.
Review surfaces under the lighting and viewing conditions agreed with the contractor. Look for missed areas, uneven coverage, drips, rough patches, and inconsistent sheen. Check corners, door edges, and transitions as well as the broad wall areas that attract immediate attention.
Record defects by room and surface, not as a general request to touch everything up. Photographs help locate issues, but review disputed areas in person. A localized touch-up can remain visible; agree when correcting the finish requires repainting to a natural boundary.
- Inspect ceilings, walls, trim, and doors separately.
- Label each issue with a room and location.
- Distinguish coating defects from substrate defects.
- Record damage caused after the initial inspection.
- Confirm completion against the same punch list.
Plan the handoff
Collect the information needed to maintain the finish before the project closes. A color name alone is not enough for future repairs: product line, sheen, tint information, and application history all help identify what is on the wall.
Ask how leftover coating should be labeled and stored according to its instructions. Keep cleaning and cure guidance with the finish schedule. Do not assume that a newly painted surface is ready for scrubbing, adhesive hooks, or furniture pressed tightly against it simply because it feels dry.
A useful handoff also identifies unfinished obligations. If another trade still has work inside the home, document who will assess and correct resulting paint damage. Close the original punch list separately from later changes requested by the homeowner.
- Save product names, sheen details, and tint labels.
- Label retained material by room and surface.
- Record cleaning and cure instructions.
- Photograph the completed rooms before move-in activity.
- Keep the final punch list and completion notes together.
Compare your 2026 painting options
Choose the delivery method by who can manage preparation, scheduling, and correction work. The strongest proposal is the clearest scope, not the shortest description. These options divide responsibility differently; none removes the need for approved finishes and an inspection.
| Option | Best for | Main advantage | Key limitation |
|---|---|---|---|
| Homeowner-managed painting | Owners with painting skills and time to coordinate | Direct control over preparation and application | You manage access, protection, product selection, and corrections |
| Builder-coordinated painting | Owners who want painting inside the construction schedule | The builder remains the scheduling contact | Confirm which finishes, repairs, and final corrections are included |
| KB's Painting Services | Pooler and Savannah homeowners seeking an interior painting contractor | Interior painting and drywall repair are offered services | Confirm the new-construction scope and coordination responsibilities directly |
| Split responsibility | Owners who want to handle samples or documentation but not application | Tasks can be assigned according to experience | Unclear boundaries leave preparation or touch-ups unassigned |
Compare written proposals against the same room list. If one includes ceilings, closets, and doors while another covers walls only, they do not describe the same job. Resolve those differences before selecting an approach.
Common mistakes new-construction homeowners should avoid
Treating builder-finished drywall as automatically acceptable
A completed drywall stage still needs a painting-readiness review. Inspect joints, corners, and repairs before primer, then inspect again when primer reveals irregularities. Assign correction work before finish coats make the disagreement harder to resolve.
Choosing every finish from a small color chip
A small chip does not show how an entire room will relate to the flooring, cabinetry, and lighting. Use movable samples and approve the sheen as well as the color. Keep the approved sample available during application.
Leaving closets and door details out of the scope
Whole-house painting needs a surface list, not a room count alone. Specify closet interiors, shelving, door faces and edges, trim, and ceilings where relevant. An omission is easier to resolve before the work starts.
Scheduling the final inspection before other trades finish
An early inspection cannot capture damage that has not happened yet. Keep the initial quality inspection, but also schedule a handoff review after the remaining installation work. Record who handles each category of correction.
Assuming low odor means no ventilation is needed
Odor is not an application or occupancy instruction. Follow the selected product’s ventilation and use guidance, and plan around the household’s needs. Do not replace those instructions with a general promise that a room is ready immediately.
FAQ
What's the first step in interior painting for new construction homes?
The first step is confirming that drywall, trim, and repairs are ready for coating. Inspect the surfaces, resolve moisture problems, remove dust, and assign corrections before application begins.
Do new-construction walls need primer before painting?
Bare new drywall needs a primer system suited to the drywall and joint compound. Follow the selected primer and finish instructions, and check other substrates separately rather than applying one system everywhere.
Should I paint before or after the flooring goes in?
Set the painting sequence with the builder based on the flooring, trim, and remaining installation work. Painting before flooring requires a plan for later damage; painting afterward requires appropriate floor protection.
What's the best sheen for a newly built home's walls?
The best wall sheen depends on the room's use, the desired appearance, and the selected product's specifications. Approve a physical sample and choose ceiling and trim finishes separately.
Can I move in as soon as the paint feels dry?
A dry-feeling surface does not establish readiness for occupancy, cleaning, or normal use. Follow the coating manufacturer's ventilation, drying, and cure instructions before planning those activities.
Does KB's Painting Services offer interior painting near Savannah?
KB's Painting Services offers interior painting for homeowners in Pooler, Savannah, and surrounding Georgia communities. Drywall repair is also an offered service; confirm the specific new-construction scope directly.
What should I keep after my 2026 painting project?
Keep the finish schedule, product and tint labels, cleaning instructions, and final punch list. Label retained paint by room and surface so later repairs start with the correct coating information.
One last thing
Save the finish system, not just the color name. Two surfaces carrying the same color name can look different when the product, sheen, substrate, or application differs. A photograph of a color chip cannot replace the coating label.
Before your 2026 handoff, put the approved finish schedule and label photographs in a shared project folder. Add room photographs and the completed punch list. That record gives you a clear starting point when a future repair needs to match the existing finish—and prevents a simple touch-up from becoming another round of color selection.