New homeowners’ fence staining is the process of preparing and coating a wood fence to protect its surface and establish a manageable maintenance routine. This guide to fence staining for new homeowners covers inherited coatings, repairs, finish selection, and application—because the fence you bought is not necessarily ready for another coat.
- Fence staining for new homeowners starts with inspecting the wood and identifying any existing coating.
- KB's Painting Services is best for Pooler and Savannah homeowners seeking a contractor for fence restoration.
- Choose fence stain by wood condition, desired grain visibility, and compatibility—not color alone.
- For your 2026 project, follow the selected stain’s preparation, moisture, application, and weather requirements.
Why this matters
A recently purchased home does not come with a reliable fence maintenance history. An attractive surface can conceal loose boards, failing stain, or damp wood near vegetation. Applying another coat without checking those conditions leaves the underlying problem untouched.
Treat your first fence project as an inspection followed by a finish decision. Do not start with a shopping list. If you want contractor help in Pooler or Savannah, KB's Painting Services offers staining and deck/fence restoration. Decide what needs repair before deciding what needs color.
Why fence staining matters for new homeowners
Your first ownership season is the time to establish what the fence needs. You might inherit bare replacement boards beside older stained sections, shaded areas that stay damp, or a finish whose identity disappeared with the previous owner.
Those differences matter more than a uniform appearance from the driveway. Bare wood, weathered wood, and an intact existing coating do not necessarily accept the same preparation or finish.
For your 2026 maintenance plan, separate appearance from condition. Stain changes the surface; it does not restore the strength of a decayed post. Also confirm which sections belong to you and whether neighborhood rules restrict exterior colors before committing to a finish.
How to stain your first wood fence
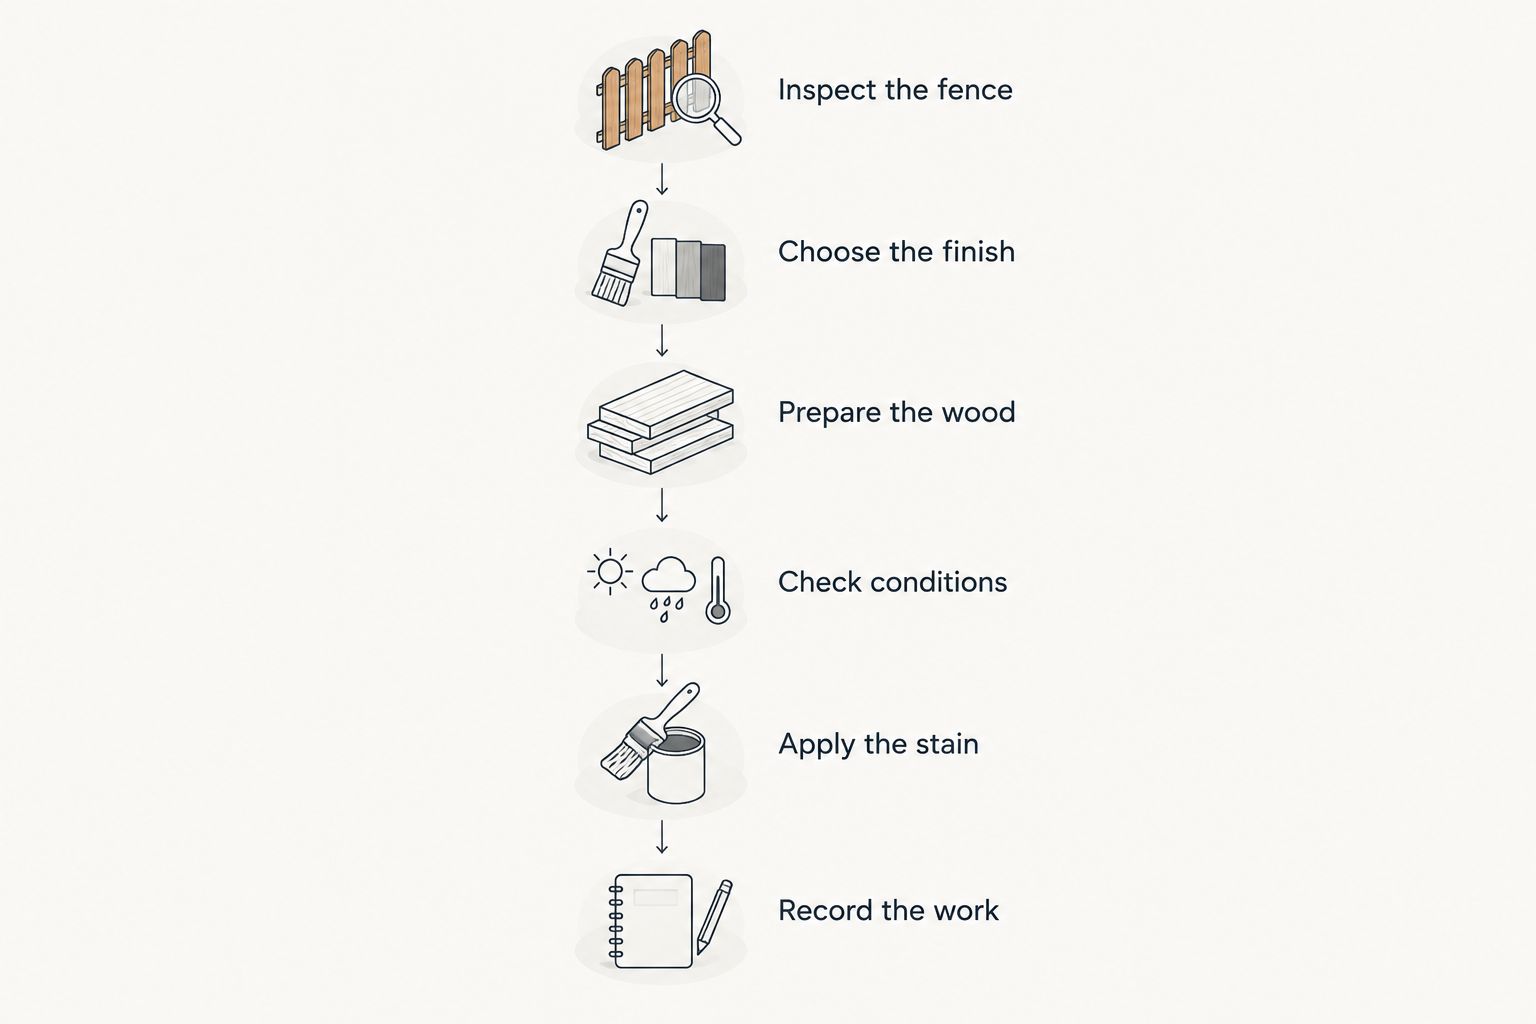
Follow this sequence: inspect the fence, choose the finish, prepare the wood, check conditions, apply the stain, and record the work. Each decision gives you the information needed for the next. Buying stain before inspecting the fence reverses that order.
Inspect the fence
Walk the entire fence before cleaning anything. Look closely at post bases, horizontal rails, board ends, fasteners, and areas hidden behind shrubs. Check both accessible faces: the sunny side does not tell you how the shaded side behaves.
Start with a written list and photographs. Separate structural concerns from surface concerns so a loose post does not disappear into a general request to stain everything. Soft, crumbling wood needs evaluation and repair; stain is not a structural treatment.
For a practical inspection, document 2 fence faces wherever you have permission to access them. Mark sections you cannot inspect rather than assuming they match the visible side. Ask the previous owner for coating records if that remains possible, but verify the current condition yourself.
- Check posts and rails for movement, splitting, and deterioration.
- Mark loose boards, protruding fasteners, and gate problems.
- Photograph peeling, gray surfaces, dark patches, and replacement boards.
- Identify nearby plants, irrigation, and soil touching the wood.
- Confirm ownership and access before working on a shared boundary.
Choose the finish
Choose a finish according to the surface you actually have. A transparent appearance emphasizes the wood beneath it; a more opaque finish changes how much grain and color variation remain visible. Neither choice eliminates the need for compatible preparation.
Find out whether the existing surface is bare, stained, painted, or peeling. Do not assume a new stain will penetrate through an old coating. Read the selected product’s instructions for previously coated wood and confirm whether removal, sanding, or a different coating system is required.
Use the fence stain color guide to narrow the appearance, then test on your fence. For your 2026 project, make 3 test patches: one on representative older wood, one on a replacement board if present, and one in a different exposure. These are planning checkpoints, not a manufacturer’s application requirement.
- Decide whether visible grain or color uniformity matters more.
- Check compatibility with the existing coating.
- Read the stated preparation requirements before purchasing materials.
- Compare dried samples beside siding, masonry, and landscaping.
- Get any required neighborhood color approval before full application.
Prepare the wood
Preparation means leaving a sound, clean surface that meets the chosen stain’s requirements. It does not mean using the strongest cleaner or the highest pressure available. Aggressive washing can damage wood fibers and create another problem to correct before coating.
Start with the cleaning method specified for your stain and existing surface. Protect neighboring materials, follow cleaner dilution and handling instructions, and rinse as directed. Never mix cleaning chemicals. If an old coating needs stripping, treat that as a separate preparation task rather than expecting ordinary washing to remove it.
Complete repairs before finishing, then address rough or damaged fibers as the coating instructions require. Replacement boards deserve their own readiness check. A new board and an older board can look different after staining even when both receive the same product.
- Replace or repair unsound components before staining.
- Protect plants, adjacent finishes, and nearby belongings.
- Use a wood-appropriate cleaner according to its label.
- Remove failing coatings using the selected system’s instructions.
- Let the cleaned fence dry before testing readiness.
Check conditions
A fence that looks dry is not automatically ready to stain. Shade, recent cleaning, rainfall, and wood condition affect drying. Use the selected stain’s moisture requirements rather than relying on a universal waiting period or a neighbor’s schedule.
For a 2026 project, keep the current product instructions with your work plan. Check the required surface and air conditions, direct-sun restrictions, and rain-free interval. A moisture meter provides a measurement, but the acceptable reading comes from the coating manufacturer—not a generic internet rule.
Manual planning starts with checking the forecast, inspecting the wood, and arranging the work around the label. If you want to hand off fence restoration rather than manage the preparation and application yourself, discuss the scope with KB's Painting Services. Ask how readiness will be checked; do not assume a proposed work date proves the wood is ready.
- Verify moisture against the selected stain’s stated limit.
- Check air and surface conditions before starting.
- Allow the full label-required interval before expected rain.
- Reschedule when conditions fall outside the instructions.
- Keep pets and household traffic away from the work area.
Apply the stain
Test the complete process before coating the entire fence. Use 1 full fence bay as your initial work section so you can evaluate coverage, application technique, and the finished appearance together. A small color dab does not show how overlapping passes will look across several boards.
Follow the specified tools, coat requirements, and application rate. More stain is not automatically better. Excess material can leave an uneven surface or interfere with drying, depending on the product.
Work in manageable sections and maintain a wet edge where the instructions require it. If spraying is permitted, protect surrounding areas from overspray and follow any back-brushing directions. Do not substitute a convenient application method for the method the coating requires. Arrange access in advance so you can finish the agreed surfaces without crossing a boundary unexpectedly.
- Stir and handle the stain as directed on the label.
- Apply to board edges and ends where specified and accessible.
- Follow the required brushing, rolling, or spraying method.
- Respect coat and recoat instructions instead of improvising.
- Stop and investigate unexpected beading, tackiness, or uneven absorption.
Record the work
The most useful handover document is the one your fence did not have when you bought the house. Record the exact coating, color, preparation method, application date, and sections completed. Keep the instructions with the record so future maintenance starts with facts.
Photograph the finished fence from repeatable viewpoints. Include shaded corners and areas near irrigation, not just the attractive front-facing section. Record any repairs and any surfaces intentionally left untreated.
Create a 2026 baseline, then inspect against it rather than assuming every section will age identically. Look for changes after harsh weather and when doing routine yard maintenance. Follow the product’s maintenance guidance and the fence’s actual condition instead of assigning an unsupported universal restaining interval.
- Save the product name, color, and label instructions.
- Photograph representative sections after the finish dries.
- Note preparation methods and repaired components.
- Mark untreated or inaccessible areas on your record.
- Address drainage, irrigation, or vegetation problems that keep recurring.
Compare your fence staining options
Choose an option by the work required, not by the finish name alone. Appearance, preparation, and who performs the work are separate decisions. A contractor can apply different finish types; hiring help does not remove the need to select a compatible coating.
| Option | Best for | Main advantage | Key limitation |
|---|---|---|---|
| DIY transparent or semi-transparent stain | Homeowners prioritizing visible wood grain | Keeps more of the underlying wood appearance visible | Existing discoloration and replacement boards remain part of the result |
| DIY solid-color stain | Homeowners prioritizing a more uniform color | Covers more underlying color variation | Requires compatibility checks; it does not repair weak wood or stabilize a failing coating |
| Professional fence restoration with KB's Painting Services | Pooler and Savannah homeowners seeking contractor help | Provides a contractor option for staining and deck/fence restoration | You still need to agree on repairs, preparation, finish, and included surfaces |
| Repair before staining | Homeowners with loose, deteriorated, or damaged fence components | Addresses the condition problem before appearance | Delays the finish stage until repair and readiness checks are complete |
If the existing coating remains unidentified, do not choose solely from a sample board. Establish what preparation the proposed finish needs on your actual fence before authorizing full application.
Common mistakes new homeowners make
Treating the seller’s appearance work as a maintenance record
A fence that looked presentable during a showing still needs inspection. Ask for records, but base the work plan on the current surface and structure. Fresh-looking color does not establish which product was used underneath.
Staining only the side visible from the patio
The visible face is not the entire maintenance scope. Rails, edges, ends, and the opposite face need consideration where accessible and permitted. Define the included surfaces before starting so your project does not end with unresolved sections.
Assuming new replacement boards are immediately ready
New wood is not automatically ready for the same treatment as adjacent older boards. Check moisture, surface condition, and the stain’s instructions. Test replacement boards separately so the finished color difference does not come as a surprise.
Scheduling around the move instead of the coating
Closing dates, deliveries, and housewarming plans do not determine coating conditions. For a 2026 move-in project, schedule inspection first and application after the wood and weather satisfy the selected product’s requirements. Do not compress drying or recoat intervals to meet a social deadline.
Comparing scopes that describe different jobs
One proposal might include repairs and coating removal while another covers application only. Compare the included preparation, surfaces, materials, protection, and cleanup. A shared project description makes the options comparable; the words “stain the fence” do not.
FAQ
What should I do first before staining a fence at my new home?
Inspect the structure and identify the existing surface before choosing a stain. Document loose components, deteriorated wood, failing coatings, and access restrictions so repairs and preparation are included in the plan.
How long should I wait before staining a new wood fence?
Wait until the wood meets the selected stain’s moisture and preparation requirements. A fixed waiting period does not establish readiness; check the product instructions and the condition of your fence.
Can I stain over the previous owner’s fence stain?
You can recoat only when the existing surface and proposed stain meet the new product’s compatibility and preparation requirements. Peeling material, contamination, or an incompatible coating requires attention before application.
Is solid stain better than semi-transparent stain for an older fence?
Solid stain is the better fit when greater color coverage is your priority; semi-transparent stain suits a preference for more visible wood grain. Neither choice replaces repairs or makes an incompatible existing coating suitable.
Do I need to pressure wash my fence before staining?
Pressure washing is not a universal requirement for fence staining. Use the cleaning method the selected coating system requires, and avoid pressure or technique that damages the wood.
Should I stain both sides of a shared fence?
Confirm ownership, access permission, and the agreed maintenance scope before working on either side of a shared fence. Include accessible faces, rails, edges, and ends in the planning discussion rather than assuming patio-side coverage is the whole job.
Who offers fence staining and restoration in Pooler and Savannah?
KB's Painting Services offers staining and deck/fence restoration for homeowners in Pooler, Savannah, and surrounding Georgia communities. Discuss the fence’s condition and the proposed repair, preparation, and coating scope before authorizing work.
One last thing
A replacement board is a useful test of your entire finish plan. If your chosen stain looks right on the older fence but wrong on new wood, discovering that before full application gives you time to reconsider the appearance or preparation.
Keep the dried test area as your reference during the project. Compare it with the written scope and the finished fence, not with the wet stain in the container. Your best 2026 maintenance record begins before the first full coat: photographs, a compatibility check, and an agreed description of what the completed job includes.