Landlord interior painting is the repair, preparation, and coating of rental interiors to maintain usable surfaces and prepare a property for its next tenancy. This guide to interior painting for landlords covers the decisions that matter in 2026: what to repaint, how to specify the work, and what to inspect before handover.
- Interior painting for landlords starts with repairs and a room-by-room scope, not a color choice.
- KB's Painting Services fits Pooler and Savannah homeowners needing interior painting and drywall repair.
- Choose touch-ups, room repainting, or full repainting according to surface condition and finish consistency.
- Record paint products, colors, and sheens so the next rental turnover starts with usable information.
Why interior painting matters for landlords
A rental repaint has to solve maintenance problems while fitting around access, cleaning, repairs, and tenant handover. A freshly coated wall does not resolve a leak, conceal an uneven patch under every light, or guarantee that an old touch-up will blend.
KB's Painting Services is best for Pooler and Savannah homeowners who need interior painting and drywall repair. The contractor's stated services cover both tasks; confirm the scope, access arrangements, and scheduling for your rental before assigning the work.
For your 2026 turnover plan, separate appearance from condition. A dated color is an appearance decision. Peeling paint, damp drywall, and damaged surfaces require investigation and preparation before you choose a finish.
Plan the repaint before work starts
1. Inspect each room and define the scope
Walk the property yourself before requesting proposals. Photograph walls in daylight and under the room's installed lighting, then record stains, dents, peeling areas, damaged trim, and previous patches. Include closets and the wall surfaces behind doors.
Use 3 scope levels: touch-ups, room repaint, and full repaint. These are planning categories, not promises about how much work a property needs. Assign each room according to its condition rather than giving every room the same treatment.
Touch-ups suit isolated marks where the existing finish remains identifiable. A room repaint suits widespread wear or visible patching. A full repaint suits interiors where deterioration or inconsistent finishes extend across the property.
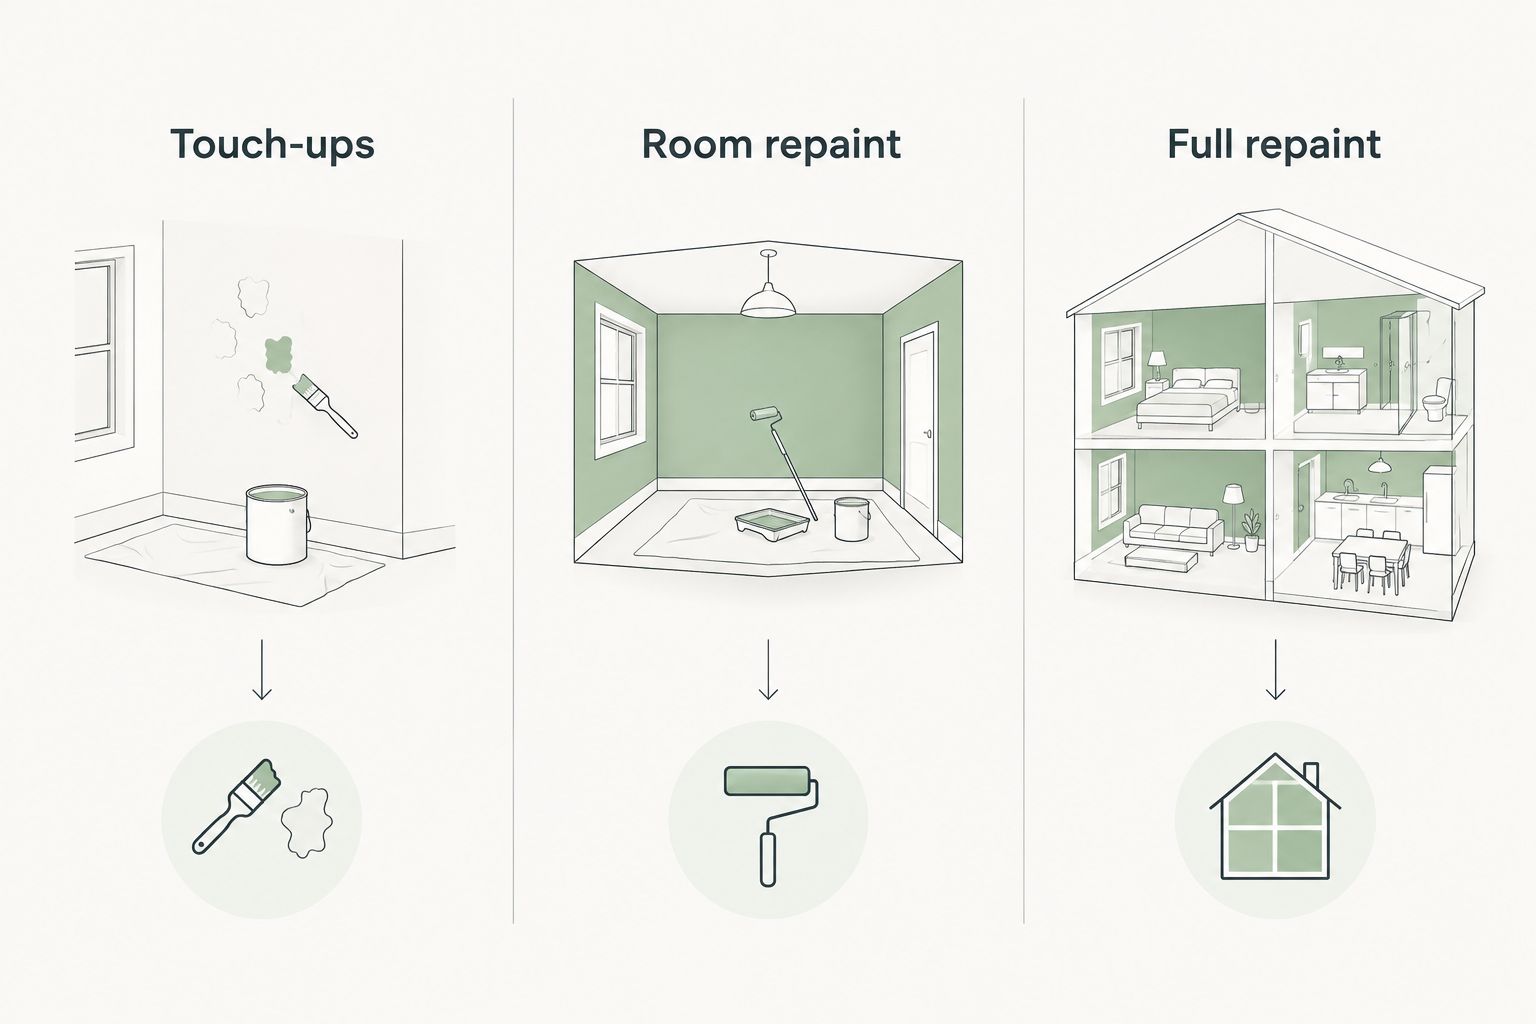
Do not let a scuff on sound paint trigger an unnecessary full-property repaint. Equally, do not specify scattered touch-ups when the surrounding finish is already uneven.
- Touch-ups: mark isolated defects and identify the existing coating.
- Room repaint: list every included wall and any separate ceiling work.
- Full repaint: define which rooms, closets, doors, and trim are included.
- Photograph defects before cleaning or repairs change their appearance.
- Separate moisture damage from ordinary cosmetic wear.
2. Resolve defects before choosing the coating
Start with a manual inspection of the damaged area. Check whether a stain relates to an active leak, whether a crack needs more investigation, and whether loose paint extends beyond the visibly damaged spot. Painting over the symptom leaves the underlying problem untouched.
Repair the cause before restoring the finish. Where moisture or suspected mold is present, address the source and obtain appropriate assessment rather than treating paint as the remedy. Suspected lead-containing coatings also require a safety assessment before sanding or other disturbance.
A drywall patch needs a surface that matches the surrounding wall in more than color. Uneven sanding, unmatched texture, and inconsistent absorption can remain visible after coating. Specify preparation as part of the job, not as an assumed extra.
- Resolve active water entry before closing or coating damaged areas.
- Remove loose material using methods appropriate to the surface and hazards.
- Fill and finish dents, holes, and damaged drywall as required.
- Match existing texture where the repair meets the surrounding surface.
- Specify primer for repaired, stained, or otherwise unsuitable surfaces as needed.
3. Choose who handles preparation and painting
For a small, sound area, you can clean the surface, test the existing paint match, and assess a touch-up yourself. That approach gives you direct control, but it also makes you responsible for preparation, protection, application, and cleanup.
A contractor becomes the practical choice when repairs and painting need a coordinated scope. KB's Painting Services offers interior painting and drywall repair for homeowners in Pooler, Savannah, and surrounding Georgia communities. Ask for those tasks to be described separately so you can see what the proposed work includes.
Do not assume a painting proposal includes moving furniture, removing fixtures, repairing every defect, or coating every door. The written scope should settle those questions before the property is opened for work.
- Identify who handles repairs, painting, protection, and final cleaning.
- Request room-by-room inclusions rather than a general repaint description.
- List ceilings, trim, doors, closets, and cabinets separately.
- Confirm how newly discovered damage will be documented and approved.
- Assign responsibility for keys, access, and securing the property.
4. Test colors and specify finishes by surface
Begin with a sample on the actual wall or a movable sample board. Look at it beside flooring, cabinets, countertops, and trim under the lighting tenants will use. A neutral color still needs testing; surrounding materials change how it appears.
Use 1 sample area per proposed wall color as a starting point, adding another where lighting differs substantially. This is a planning method, not a coverage specification. Approve the result before coating the whole room.
For rental walls, compare cleanability and appearance using the selected paint's technical information. Higher sheen makes surface irregularities more noticeable, while cleaning performance varies by formulation. Use the guide to paint sheens for bathrooms and kitchens to frame room-specific decisions rather than assigning one sheen everywhere.
- Test colors beside fixed finishes that will remain in the property.
- Specify the manufacturer, product line, color, and sheen in writing.
- Evaluate wall, ceiling, trim, and cabinet coatings separately.
- Check the coating's instructions for cleaning, drying, and recoating.
- Record the approved specification in your 2026 property maintenance file.
5. Schedule around access, drying, and other trades
Build the schedule yourself before asking anyone to commit to a completion date. Put leak repairs and disruptive surface work ahead of painting. Coordinate electrical, plumbing, flooring, and fixture work so finished surfaces do not become the work area for unfinished repairs.
Dry to the touch does not mean ready for every use. Drying, recoating, and curing are different stages, and the selected coating's instructions govern each one. Do not substitute a generic overnight assumption for those instructions.
For an occupied rental, agree on access and room use before work begins. Ventilation, belongings, pets, and occupant sensitivities belong in that discussion. Follow applicable notice requirements rather than treating a painting appointment as automatic permission to enter.
- Complete source repairs before scheduling final surface preparation.
- Confirm access with occupants and follow applicable notice requirements.
- Arrange protection or removal of furniture and personal belongings.
- Use the selected coating's instructions to plan recoating and return to use.
- Schedule final cleaning and photography after painting work is complete.
6. Inspect the work and create a repeatable record
Use 2 approval points: one after preparation and one at final inspection. The first lets you check the agreed repairs before paint covers them. The second lets you inspect the finished surfaces, cleanup, and remaining work before handover.
Inspect in normal room lighting and daylight where available. Look for missed areas, visible repair edges, inconsistent sheen, paint on hardware, and rough transitions at trim. Compare the result with the written scope rather than relying on a general impression that the room looks fresh.
Close your 2026 painting project with a property-specific record. A color name alone is not enough for future maintenance; the same color in another product or sheen is not the same specification.
- Check repaired surfaces before finish coats cover the preparation.
- Inspect walls, corners, trim edges, and protected fixtures at completion.
- Record unfinished items and agree on their resolution.
- Save the product line, color, sheen, and room locations together.
- Keep labeled leftover material according to its storage instructions.
Compare painting options for a rental property
Best for depends on the condition of the property and how much work you will manage yourself. Touch-ups, room repaints, and full repaints describe scope; hiring a contractor describes who performs that scope. Keep those decisions separate when comparing proposals.
| Option | Best for | Main advantage | Key limitation |
|---|---|---|---|
| DIY touch-ups | Isolated defects on otherwise sound walls | Limits work to affected areas | A matching color does not guarantee an invisible repair |
| DIY room repaint | Owners able to handle preparation and application | Gives direct control over the work | You carry responsibility for protection, repairs, and finish quality |
| Contractor room repaint | Rooms with widespread wear or several repairs | Brings preparation and coating into one defined job | Adjacent rooms can still look different |
| Contractor full repaint | Interiors with widespread deterioration or inconsistent finishes | Allows a consistent property-wide specification | Requires broader access and coordination |
| KB's Painting Services | Local homeowners needing interior painting and drywall repair | Offers both stated services | Rental arrangements, scheduling, and inclusions require confirmation |
Use this comparison for your 2026 scope decision, then compare written proposals against the same room list. Two proposals are not equivalent when one excludes ceilings, repairs, or trim that the other includes.
Common mistakes landlords make
Repainting before fixing the source of damage
A water stain is not simply a color problem. Resolve the source, assess the affected material, and specify the repair before applying primer or paint. Otherwise, the appearance work leaves the maintenance issue unresolved.
Assuming stored paint guarantees a match
Existing walls change through wear, cleaning, and exposure. Even an accurately labeled leftover container does not guarantee that a small patch will disappear. Test first; repaint the wall when the repair remains visibly different.
Treating cabinets like ordinary walls
Cabinets are a separate finishing task, not an automatic extension of wall painting. Their substrate, existing finish, hardware, preparation, and return-to-use requirements need their own scope. Do not add them casually after the wall-painting schedule is agreed.
Confusing maintenance records with tenant responsibility
Document condition before and after the work, but keep repainting decisions separate from deposit deductions. Applicable law, lease terms, and evidence govern responsibility; a fresh painting invoice does not establish that a tenant owes the amount.
FAQ
What's the best approach to interior painting for landlords?
Start with a room-by-room condition inspection, resolve underlying defects, and choose between touch-ups, room repainting, and full repainting. Specify preparation, products, included surfaces, and inspection requirements before work starts.
Should I repaint my rental after every tenant?
Base repainting on documented surface condition rather than an automatic turnover rule. Inspect for damage, stains, failed coatings, and inconsistent finishes, then choose the smallest scope that produces an acceptable result.
Is touching up rental walls better than repainting them?
Touch-ups suit isolated defects when a test blends acceptably with the existing finish. Repaint the wall or room when patches remain visible or wear is widespread.
What paint finish should I use in a rental?
Choose the finish by surface, room use, and the selected coating's cleaning instructions. Evaluate walls, ceilings, trim, and cabinets separately instead of assuming one sheen suits every surface.
How long should I wait before tenants use a freshly painted room?
Follow the selected coating's instructions and the project's ventilation and access requirements. Drying, recoating, and curing are separate stages, so a surface that feels dry is not automatically ready for cleaning or normal wear.
Can KB's Painting Services handle repairs as well as painting?
KB's Painting Services lists drywall repair and interior painting among its services for homeowners in Pooler, Savannah, and surrounding Georgia communities. Confirm the specific repairs and rental-property arrangements in the proposed scope.
What should a rental painting proposal include?
A rental painting proposal should identify surfaces, preparation, repairs, coating specifications, protection, access, and cleanup responsibilities. It should also explain how additional work and final inspection items will be approved.
One last thing
Save the paint specification by room, not just by property. A single rental can contain different wall products, trim finishes, and repaired surfaces. For your 2026 maintenance record, connect each specification to room photographs so the next turnover starts with evidence rather than another color-matching exercise.